Development
Useful Resources
IRC channels on chat.freenode.net (quick communication and discussion):
#moin-dev (core development topics)
#moin (user support, extensions)
Wikis:
https://moinmo.in/ (production wiki, using moin 1.9)
Documentation (installation, configuration, user docs, api reference):
Repository, Issue tracker (bugs, proposals, todo), Code Review, etc.:
Requirements for development
The virtualenv Python package is required. The installation process for virtualenv varies with your OS and Python distribution. Many linux distributions have a package manager that may do the installation. Windows users (and perhaps others) may download setuptools from https://pypi.org/project/setuptools/. Once setuptools is installed, do “easy_install virtualenv”. Current ActiveState distributions include virtualenv in the installation bundle. If all else fails, try your favorite search engine.
git is required should you wish to contribute patches to the moin2 development effort. Even if you do not intend to contribute, git is highly recommended as it will make it easy for you to obtain fixes and enhancements from the moin2 repositories. git can be installed with most linux package managers or downloaded from https://git-scm.com/. You can also find GUI clients there.
Typical development workflow
This is the typical workflow for anyone that wants to contribute to the development of Moin2.
create your development environment
if you do not have a github account, create one at https://github.com/
fork the main repository: https://github.com/moinwiki/moin to your gh user
clone your gh repo to your local development machine:
cd <parent_directory_of_your_future_repo>
git clone https://github.com/yourname/moin.git
cd to repo root:
cd moin
create the virtualenv and download packages:
python quickinstall.py
activate virtualenv:
. activate # Windows: activate
create a wiki instance and load help data and welcome pages:
moin create-instance --full
start the built-in server:
moin run
point your browser at http://127.0.0.1:5000/ to access your development wiki
key ctrl+C to stop the built-in server
add more tools, exercise tools
install additional software that developers may require:
./m extras # Windows: m extras
run the unit tests, note any existing test failures:
./m tests # Windows: m tests
install NodeJS and NPM with Linux package manager; Windows users may download both from https://nodejs.org/download/
On Ubuntu 14.04 or any distribution based on Ubuntu you need to install “npm” and “nodejs-legacy” (to get the “node” command).
install lessc (“less” below is not a typo):
sudo npm install less -g  # Windows: npm install less -g
lessc --version"  # show version number to prove it works
regenerate CSS files:
./m css  # Windows: m css
git diff  # verify nothing changed
check for coding errors (tabs, trailing spaces, line endings, template indentation and spacing):
./m coding-std  # Windows: m coding-std
git diff  # verify nothing changed
revert any changes from above:
git reset --hard
create local docs:
./m docs # Windows: m docs
install the pre-commit hook:
pre-commit install # pre-commit is used for code linting / auto-format
set options on your favorite editor or IDE
convert tabs to 4 spaces
delete trailing blanks on file save
use unix line endings (use Windows line endings on .bat and .cmd files)
use mono-spaced font for editing
if you are new to git, read about it (https://git-scm.com/book/), consider printing a cheatsheet
if you want a Python IDE, try https://www.jetbrains.com/pycharm/ Free Community Edition
join #moin-dev IRC channel; ask questions, learn what other developers are doing
review configuration options
review https://moin-20.readthedocs.io/en/latest/admin/configure.html
configure options by editing wikiconfig.py
set superuser privileges on at least one username
the default configuration options are commonly used, it is likely new bugs can be found by testing different options
find a task to work on
look at the issue tracker to find a task you can solve
in case you find a new bug or want to work on some (non-trivial) new issue or idea that is not on the issue tracker, create an issue with a detailed description
discuss your chosen task with other developers on the #moin-dev IRC channel
to avoid duplicate work, add a comment on the issue tracker that you are working on that issue
just before you start to code changes, bring your repo up to date:
git checkout master       # make sure you are on master branch
git pull mm master        # update your master branch
git checkout -b mychange  # create a new branch "mychange"
...                       # implement your change
tox                       # run the tests, fix any new failure!
git status                # check what new files you created
git diff                  # check what changes you did
git add ...               # add the files you want to commit
git commit                # commit, write a nice commit comment
git push                  # push to your gh user's moin repo
...                       # go to gh moinwiki/moin and make a PR
develop a testing strategy
if you fix something that had no test, first try to write a correct, but failing test for it, then fix the code and see a successful test
if you implement new functionality, write tests for it first, then implement it
make a plan for using a browser to test your changes; which wiki pages are effected, how many browsers must be tested
develop a working solution
work in your local repo on your local development machine (be sure you work in the right branch)
concentrate on one issue / one topic, create a clean set of changes (that means not doing more than needed to fix the issue, but also it means fixing the issue completely and everywhere)
write good, clean, easy-to-understand code
obey PEP-8
do not fix or change code unrelated to your task, if you find unrelated bugs, create new issues on the tracker
regularly run the unit tests (“./m tests”), the amount of failing tests shall not increase due to your changes
review your working solution
use git diff, git status - read everything you changed - slowly, look for things that can be improved
if you have TortoiseGIT, use those graphical tools to review changes
look for poor variable names, spelling errors in comments, accidental addition or deletion of blank lines, complex code without comments, missing/extra spaces
fix everything you find before requesting feedback from others
run tests again “./m tests”
check for trailing spaces, line endings, template indentation “./m coding-std”
if Javascript files were changed, run https://www.jslint.com/
publish your change
do some final testing - practically and using the unit tests
commit your changes to your local repo, use a concise commit comment describing the change
while a commit message may have multiple lines, many tools show only 80 characters of the first line
stuff as much info as possible into those first 80 characters:
<concise description of your change>, fixes #123
push the changeset to your public github repo
create a pull request so your changes will get reviewed and pulled into the main repository
if you fixed an issue from the issue tracker, be sure the issue gets closed after your fix has been pulled into main repo.
celebrate, loop back to “find a task to work on”
update your virtualenv
Every week or so, do “m quickinstall” to install new releases of dependent packages. If any new packages are installed, do a quick check for breakages by running tests, starting the build-in server, modify an item, etc.
MoinMoin architecture
moin2 is a WSGI application and uses:
flask as framework
flask cli and click for command line interface
flask-babel / babel / pytz for i18n/l10n
flask-theme for theme switching
flask-caching as cache storage abstraction
werkzeug for low level web/http page serving, debugging, builtin server, etc.
jinja2 for templating, such as the theme and user interface
flatland for form data processing
EmeraldTree for xml and tree processing
blinker for signalling
pygments for syntax highlighting
for stores: filesystem, sqlite3, sqlalchemy, memory
jquery javascript lib, a simple jQuery i18n plugin Plugin
CKeditor, the GUI editor for (x)html
svgdraw as drawing tool
How MoinMoin works
This is a very high level overview about how moin works. If you would like to acquire a more in-depth understanding, please read the other docs and code.
WSGI application creation
First, the moin Flask application is created; see moin.app.create_app:
load the configuration (app.cfg)
register some modules that handle different parts of the functionality
moin.apps.frontend - most of what a normal user uses
moin.apps.admin - for admins
moin.apps.feed - feeds, e.g. atom
moin.apps.serve - serving some configurable static third party code
register before/after request handlers
initialize the cache (app.cache)
initialize index and storage (app.storage)
initialize the translation system
initialize theme support
This app is then given to a WSGI compatible server somehow and will be called by the server for each request for it.
Request processing
Let’s look at how it shows a wiki item:
the Flask app receives a GET request for /WikiItem
Flask’s routing rules determine that this request should be served by moin.apps.frontend.show_item.
Flask calls the before request handler of this module, which:
sets up the user as flaskg.user - an anonymous user or logged in user
initializes dicts/groups as flaskg.dicts, flaskg.groups
initializes jinja2 environment - templating
Flask then calls the handler function moin.apps.frontend.show_item, which:
creates an in-memory Item
by fetching the item of name “WikiItem” from storage
it looks at the contenttype of this item, which is stored in the metadata
it creates an appropriately typed Item instance, depending on the contenttype
calls Item._render_data() to determine what the rendered item looks like as HTML
renders the show_item.html template and returns the rendered item html
returns the result to Flask
Flask calls the after request handler which does some cleanup
Flask returns an appropriate response to the server
Storage
Moin supports different stores, like storing directly into files / directories, using key/value stores, using an SQL database etc, see moin.storage.stores. A store is extremely simple: store a value for a key and retrieve the value using the key + iteration over keys.
A backend is one layer above. It deals with objects that have metadata and data, see moin.storage.backends.
Above that, there is miscellaneous functionality in moin.storage.middleware for:
routing by namespace to some specific backend
indexing metadata and data + comfortable and fast index-based access, selection and search
protecting items by ACLs (Access Control Lists)
DOM based transformations
How does moin know what the HTML rendering of an item looks like?
Each Item has some contenttype that is stored in the metadata, also called the input contenttype. We also know what we want as output, also called the output contenttype.
Moin uses converters to transform the input data into the output data in multiple steps. It also has a registry that knows all converters and their supported input and output mimetypes / contenttypes.
For example, if the contenttype is text/x-moin-wiki;charset=utf-8, it will find that the input converter handling this is the one defined in converters.moinwiki_in. It then feeds the data of this item into this converter. The converter parses this input and creates an in-memory dom tree representation from it.
This dom tree is then transformed through multiple dom-to-dom converters for example:
link processing
include processing
smileys
macros
Finally, the dom-tree will reach the output converter, which will transform it into the desired output format, such as text/html.
This is just one example of a supported transformation. There are quite a few converters in moin.converters supporting different input formats, dom-dom transformations and output formats.
Templates and Themes
Moin uses jinja2 as its templating engine and Flask-Themes as a flask extension to
support multiple themes. There is a moin/templates directory that contains
a base set of templates designed for the Modernized theme. Other themes may
override or add to the base templates with a directory named themes/<theme_name>/templates.
When rendering a template, the template is expanded within an environment of values it can use. In addition to this general environment, parameters can also be given directly to the render call.
Each theme has a static/css directory. Stylesheets for the Basic theme in
MoinMoin are compiled using the source theme.less file in the Basic theme’s
static/custom-less directory.
./m css # Windows: m css
Internationalization in MoinMoin’s JS
Any string which has to be translated and used in the JavaScript code, has to be defined
at moin/templates/dictionary.js. This dictionary is loaded when the page loads and
the translation for any string can be received by passing it as a parameter to the _ function,
also defined in the same file.
For example, if we add the following to i18n_dict in dictionary.js
"Delete this" : "{{ _("Delete this") }}",
The translated version of “somestring” can be accessed in the JavaScript code by
var a = _("Delete this");
Testing
We use pytest for automated testing. It is currently automatically installed into your virtualenv as a dependency.
Running the tests
To run all the tests, the easiest way is to do:
./m tests # windows: m tests
To run selected tests, activate your virtual env and invoke pytest from the toplevel directory:
pytest --pep8  # run all tests, including pep8 checks
pytest -rs  # run all tests and output information about skipped tests
pytest -k somekeyword  # run the tests matching somekeyword only
pytest --pep8 -k pep8  # runs pep8 checks only
pytest sometests.py  # run the tests contained in sometests.py
Tests output
Most output is quite self-explanatory. The characters mean:
. test ran OK
s test was skipped
E error happened while running the test
F test failed
x test was expected to fail (xfail)
If something goes wrong, you will also see tracebacks in stdout/stderr.
Writing tests
Writing tests with pytest is easy and has little overhead. Just use the assert statements.
For more information, please read: https://docs.pytest.org/
IDE Setup
Most MoinMoin developers use PyCharm, either the Professional Edition or the Free Community Edition. Choose one or the other and follow the PyCharm setup instructions.
The screenshots below are from Windows 10, using Python 3.10 and PyCharm Community Edition to debug Moin2 code. *nix setup is similar.
Debug a Transaction
When setting up the Run/Debug Configurations, it is important to get the right values for the Script path, Parameters, Python interpreter, and Working directory. For general debugging of the moin2 code base those parameters should be similar to:
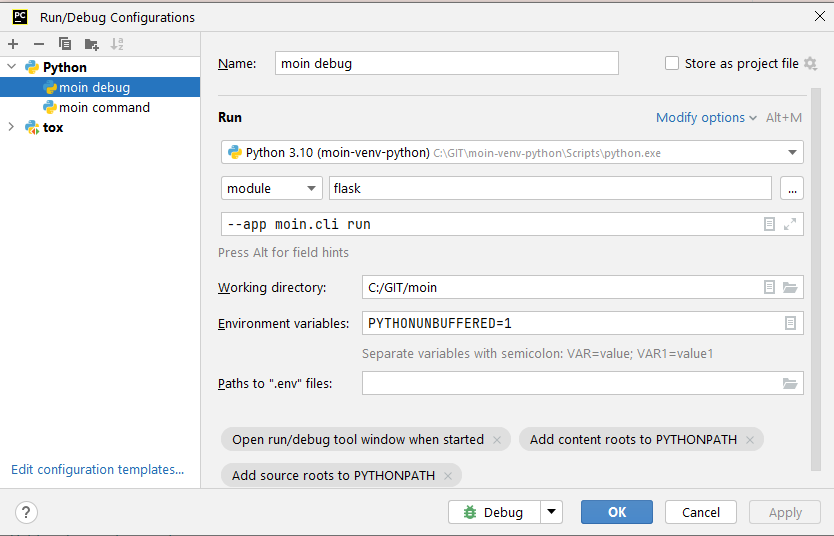
If the parameters are correct, then the Run dropdown menu will show green icons for run and debug. If the only choice under the Run menu is Edit Configuration, then one of the parameters is wrong, try again. Note: Py``Charm has a tendency to change the Working Directory field when other values are edited. Be sure it points to the repo root.
Once the configuration is correct, load a source program, set a break point and run the debugger. Point your browser to http://127.0.0.1:5000.
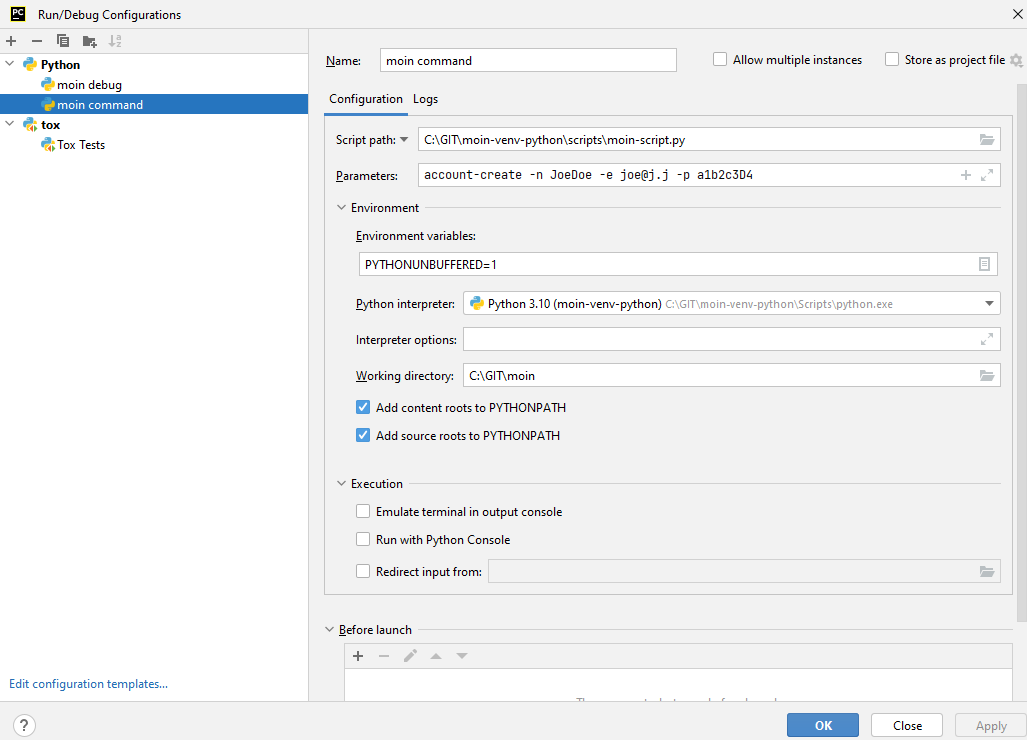
Debug a Moin Script
To debug one of the moin commands that are normally executed in a terminal window, follow the example below. You can view the list of moin commands by activating the virtual environment and doing a “moin –help”.
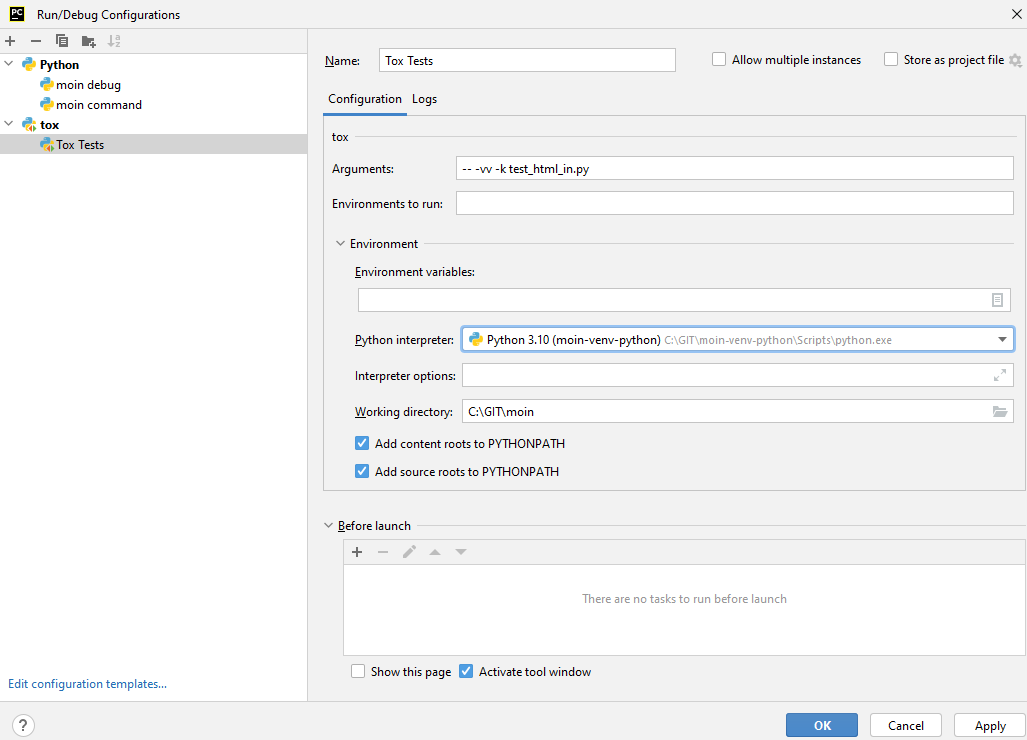
Debug a Test
To debug a test, start by going to the Py``Charm edit configuration view. Click the + in the upper left corner to show the popup list of configuration types. Choose Tox, and then follow the example below for other field values. Note the test starup will be rather slow, be patient.
Documentation
Moin provides two types of documention. The Sphinx docs (https://www.sphinx-doc.org) are written in reST markup, and have a target audience of developers and wiki admins. The Help docs have a target audience of wiki editors and are written in markups supported by moin.
The Help docs are a minor subset of the Sphinx docs and may be available in several languages. The Sphinx docs are available only in English.
Sphinx docs are available at https://moin-20.readthedocs.io/en/latest/ or may be created locally on Moin wiki’s installed by developers. Documentation reST source code, example files and some other text files are located in the moin/docs/ directory in the source tree.
Creating local Sphinx docs
Sphinx can create all kinds of documentation formats. The most common are the local HTML docs that are linked to under the User tab. To generate local docs:
./m docs # Windows: m docs
Loading the Help docs
Wiki admins must load the help docs to make them available to editors. Help docs are located in the moin/src/moin/help/ directory in the source tree. Most themes will provide a link to the markup help above the edit textarea or the entire help namespace may be accessed through the User tab. Write permission to help files is granted by default. Wiki admins can change permissions via the ACL rules.
To load the help docs:
moin load-help --namespace help-common  # images common to all languages
moin load-help --namespace help-en      # English text
Multiple languages may be loaded. Current languages include:
en
Updating the Help docs
Developers may update the help files or add new files through the normal edit process. When editing is complete run one or more of:
moin maint-reduce-revisions  # updates all items in all namespaces
moin maint-reduce-revisions -q <item-name> -n help-en --test true # lists selected items, no updates
moin maint-reduce-revisions -q <item-name> -n help-en  # updates selected items
Dump all the English help files to the version controlled directory:
moin dump-help -n help-en
The above command may may be useful after updating one or more files. All of the files will be rewritten but only the changed files will be highlighted in version control.
Moin Shell
While the make.py utility provides a menu of the most frequently used commands, there may be an occasional need to access the moin shell directly:
source <path-to-venv>/bin/activate  # or ". activate"  windows: "activate"
moin -h                             # show help
Package Release on pypi.org and Github Releases
Commit or stash all versioned changes.
Pull all updates from master repo.
Run ./m quickinstall to update the venv and translations.
Run tests.
Add a signed, annotated tag with the next release number to master branch:
git tag -s 2.0.0a1 -m "alpha release"
Install or upgrade release tools:
pip install --upgrade setuptools wheel
pip install --upgrade twine
pip install --upgrade build
Build the distribution and upload to pypi.org:
py -m build > build.log 2>&1  # check build.log for errors
py -m twine upload dist/*
Enter ID and password or API Token as requested.
Test Build
Create a new venv, install moin, create instance, start server, create item, modify and save an item:
<python> -m venv </path/to/new/virtual/environment>
cd </path/to/new/virtual/environment>
source bin/activate  # or "scripts\activate" on windows
pip install --pre moin
moin --help  # prove it works
# update wikiconfig.py  # default allows read-only, admins may load data
moin create-instance --path <path/to/new/wikiconfig/dir>  # path optional, defaults to CWD
cd <path/to/new/wikiconfig/dir>  # skip if using default CWD
moin index-create

moin run  # empty wiki, or do
moin welcome  # load welcome pages (e.g. Home)
moin load-help -n help-en # load English help
moin load-help -n help-common # load help images
moin run  # wiki with English help and welcome pages
Continue with Package Release
Push the signed, annotated tag created above to github master:
git push moinwiki 2.0.0a1
Create an ASCII-format detached signature named moin-2.0.0a1.tar.gz.asc:
cd dist
gpg --detach-sign -a moin-2.0.0a1.tar.gz
cd ..
Follow the instructions here to update GitHub; drag & drop moin-2.0.0a1.tar.gz and moin-2.0.0a1.tar.gz.asc to upload files area. These files serve as a backup for the release sdist and the signature, so anybody can verify the sdist is authentic:
https://docs.github.com/en/repositories/releasing-projects-on-github/managing-releases-in-a-repository
Test the GitHub Release package:
<python> -m venv </path/to/new/virtual/environment>
cd </path/to/new/virtual/environment>
source bin/activate  # or "scripts\activate" on windows
pip install git+https://github.com/moinwiki/moin@2.0.0a1
moin --help  # prove it works
Announce update on #moin, moin-devel@python.org, moin-user@python.org:
Moinmoin 2.0.0a1 has been released on https://pypi.org/project/moin/#history
and https://github.com/moinwiki/moin/releases. See https://moin-20.readthedocs.io/en/latest/,
use https://github.com/moinwiki/moin/issues to report bugs.